
Using a Control Sheet
Using a Control Sheet
We’re deep into the off-season and it’s that time of year when cyclists and triathletes become a little bit more concerned with “infrastructure” improvements. That is, we start to improve our indoor training space, look for new equipment, sell off the old, and are generally more willing to try new things with our bicycle position and equipment.
I don’t claim to be the best bike-fitter on earth, but one thing I am passionate about is that once I’ve found that perfect position, that feeling of my bike being an extension of my body, I want to be able to keep it. In addition, for any clients I am coaching I want to know that changes aren’t made to their position accidentally. A new bike, an accident while riding, carbon seatpost-slippage, and equipment upgrades can all conspire against your ideal ridingposition. Unless you have these measurements recorded, it may be impossible to get back to the “sweet spot” you had before.
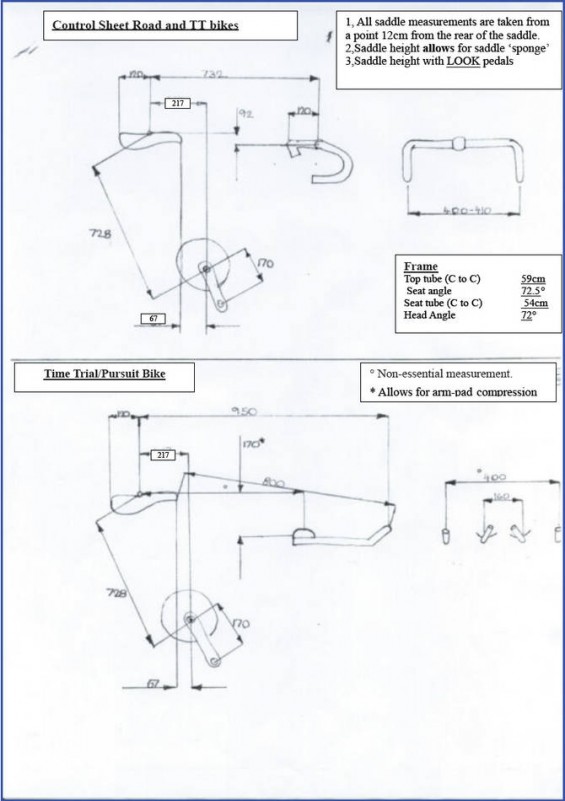
One of the tools I’ve found useful is the “Control Sheet” popularized by Chris Boardman (Olympic Champion, hour record holder, Tour prologue winner…you know, that guy) and his coach, Peter Keen. This is a handy diagram of a bicycle’s key measurements so that you can swap out parts, make position changes, and perhaps even switch over to a new bike without losing that perfect position.
When discussing rider position, there are actually two key categories. One is the actual measurements of the bicycle’s hardware while the other is what the body looks like while on the machine. The control sheet deals mainly with the measurements on the bicycle itself, though writing in the body’s key angles may also be helpful.
Once you have the diagram, the work is really pretty self-explanatory; just bust out your metric tape measure and get to work! Even though Chris Boardman’s own measurements are already inputted on the diagram, they are easily written over.
Here are a couple other useful tips:
- Make two sets of Measurements. Whenever I am making a change to my bike or a client’s bike, I will make set for pre-change and one for post-change. The work isn’t done until you have gotten both!
- Measure the tilt of the saddle. Often this will have as much impact in how the rider “feels” on the saddle as saddle height. I use a digital level to achieve this.
- When you do this, you have to pick a consistent spot on the saddle from which to measure. Personally, I measure on the furthest forward point on the saddle, beyond which the level would fall off the front of the saddle. I will also try to measure in the dead center of the saddle.
- Make sure the ground is level, otherwise the info you record is more worthless than Alec Baldwin.
- Cheater Methods for Aerobar Stack. You can either measure from the center of the front hub, or from the ground, to the top of the aerobar pad. If you measure the true “drop” between the saddle and the aerobar pad, it requires a very long level and you may need a partner to assist you.
- Scan in your results. It’s nice to have a digital copy in addition to hard copy.